When connecting your custom domain to our service (like.dev), it's important to follow a few key steps to ensure everything works smoothly. This guide will walk you through the process.
Root Domains Are Not Supported
First, a crucial point: we do not support root domains (e.g., yourdomain.com). This is because root domains typically cannot have a CNAME record pointing to our service, which is a necessary step for the custom domain to work correctly.
How to Configure Your Custom Domain with Cloudflare
To connect your custom domain to our platform, you must use Cloudflare as your DNS provider.
We require this because Cloudflare provides the necessary SSL (HTTPS) infrastructure and traffic acceleration that our platform relies on. Don't worry—Cloudflare offers a generous free tier that is perfect for this purpose.
Follow this step-by-step guide to get your site live.
Step 1: Connect Your Domain to Cloudflare
If you haven't already added your domain to Cloudflare, follow these steps first.
- Create an Account: Go to Cloudflare.com and sign up for a free account.
- Add Your Domain:
- Click the "+ Add" button, then click "Connect a domain".
- Enter your root domain (e.g.,
yourdomain.com), finally, click Continue.
- Select a Plan:
- Click on the Free plan ($0) and click Continue.
Step 2: Update Your Nameservers
Cloudflare will now provide you with two Nameservers (e.g., bob.ns.cloudflare.com and lola.ns.cloudflare.com). You need to tell your domain registrar (where you bought your domain) to use these instead of their default ones.
- Copy the Nameservers: Copy the two nameservers shown on your Cloudflare dashboard.
- Login to Your Registrar: Go to GoDaddy, Namecheap, Porkbun, or wherever you purchased your domain.
- Find DNS Settings: Look for "Nameservers", "DNS Management", or "Custom DNS".
- Replace: Delete the existing nameservers and paste the two from Cloudflare.
- Save: Save the changes.
Wait for Propagation: It may take anywhere from a few minutes to a few hours for these changes to take effect globally. Cloudflare will email you once your domain is active.
Step 3: Configure DNS Records
Once your domain is active on Cloudflare, go to the DNS > Records tab. You need to add (or edit) the following two records:
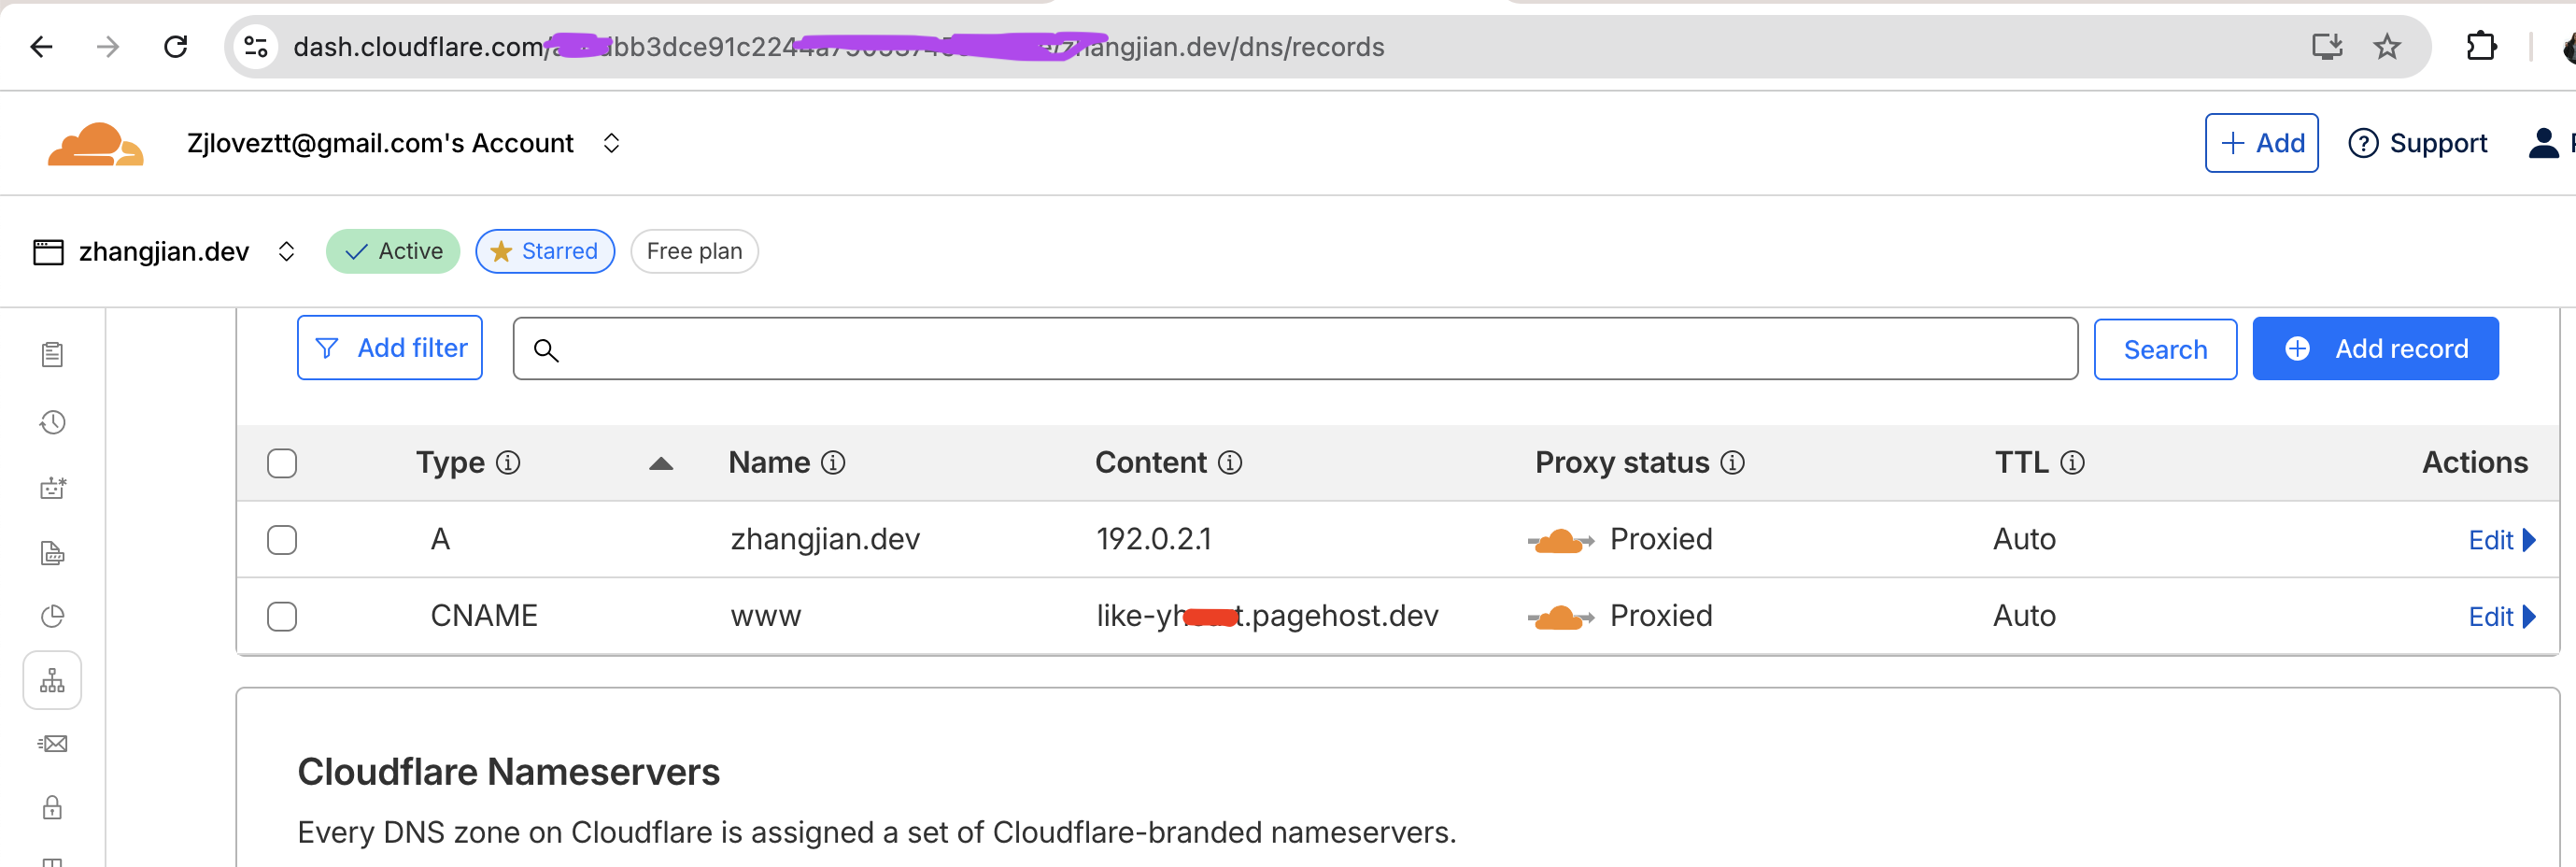
1. The Root Record (A)
This acts as a placeholder to catch traffic for your root domain so we can redirect it later.
* Type: A
* Name: @ (or yourdomain.com)
* IPv4 address: 192.0.2.1
* Proxy status: Proxied (☁️ Orange Cloud)
2. The "www" Record (CNAME)
This points your actual site traffic to our servers. If you want to use other subdomains, such as blog, simply replace all instances of www with blog in the following text.
* Type: CNAME
* Name: www
* Target: like-yheart.pagehost.dev
* Proxy status: Proxied (☁️ Orange Cloud)
Crucial: Ensure the Proxy status is Orange for both records. This is required for SSL to work.
For example, the relevant settings for https://www.zhangjian.dev are shown in the image below:
Step 4: Adjust SSL/TLS Settings
Since our origin server is optimized for performance, we let Cloudflare handle the encryption.
- Navigate to SSL/TLS > Overview.
- Set your encryption mode to Flexible.
Warning: Do not set this to "Full" or "Strict", or your site will return a 522 or 523 error.
Step 5: Set Up Redirect Rules
Finally, we ensure all visitors are redirected to the secure www (or blog, etc, just replace the www) version of your site.
Navigate to Rules > Overview (in the sidebar).
Rule1: Redirect from HTTP to HTTPS
- Click
Templates: - For template
Redirect from HTTP to HTTPS, clickPreview template. - Don't change anything, click
Deploy.
Rule2: Redirect from root to WWW
- Click
Templates: - For template
Redirect from root to WWW, clickPreview template. - Don't change anything, click
Deploy.
Summary Checklist
If you have done everything correctly, your configuration should look like this:
| Setting | Value |
|---|---|
| Nameservers | Pointing to Cloudflare |
| DNS (Root) | A Record -> 192.0.2.1 (Proxied ☁️) |
| DNS (WWW) | CNAME -> like-yheart.pagehost.dev (Proxied ☁️) |
| SSL Mode | Flexible |
| Redirect | yourdomain.com ➔ www.yourdomain.com |
Wait a few minutes for the DNS to propagate, and your site should be live and secure.